
10×10 Booth Layout Ideas for Vendors
Ten ways to arrange tables and displays in a standard 10x10 craft fair tent, with a diagram for each layout so you can picture it before you set up.
Quick Navigation
At most outdoor craft fairs, vendors use a standard 10x10 tent. While that may feel like a lot of room, it quickly becomes limited once you consider you need to store inventory and display items inside of that space.
There are many different types of booth layouts that vendors use to maximize their space. While there isn’t a single best layout, many of the different options are better for different types of vendors. Having the right vendor booth layout can improve your profitability at craft fairs substantially.
In this resource article, we want to show you many of the different booth layouts that you should consider for your next market. They all have their pros and cons, and you really have to consider what will work best for you.
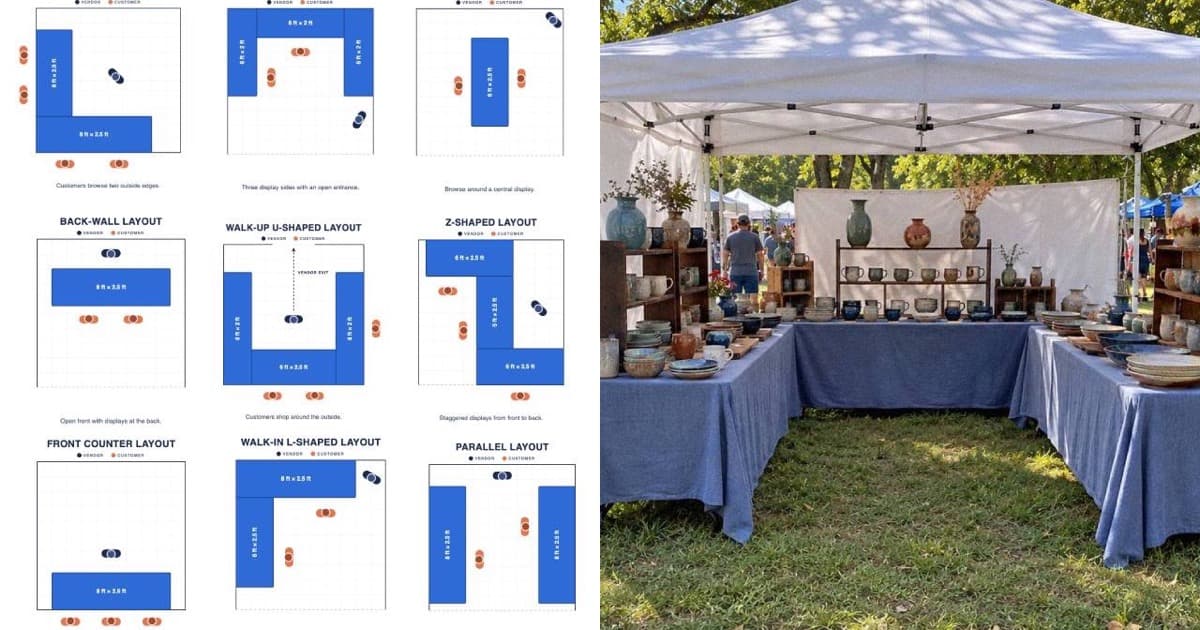

How to Choose a Craft Fair Booth Layout
Start by taking into consideration your booth’s placement within the market. Ask the craft fair organizer which sides of your booth will face a customer walkway. If you have vendors directly beside you and behind you, plan for customers to enter and shop from the front.
If your booth is located in a corner, you may want to consider a different layout than if it is located on one of the market’s sides. There can also be benefits to being on the outskirts of a market, such as being able to store excess inventory behind your booth.
You should also consider whether you will have help present, as they will also take up some space. If you already have tables, you’ll want to measure them to get a good idea of where they can fit within your booth.
Choosing Folding Tables for Your Booth
Most vendors use standard folding tables in their booth. They’re common because they’re easy to transport and can be quite versatile. Common sizes include four-foot tables, usually around 24 inches deep, and six- or eight-foot tables, often around 30 inches deep. Six-foot tables are a useful starting point, while four-foot tables give you more flexibility for smaller displays or checkout areas. An eight-foot table provides plenty of display space, but can make a 10×10 booth feel crowded. Check the depth as well as the length, since deeper tables leave less room for shoppers. Fold-in-half models are easier to fit in a car, and adjustable-height tables let you raise small products for easier browsing.
10 Booth Layout Ideas
1. Front Counter Booth Layout
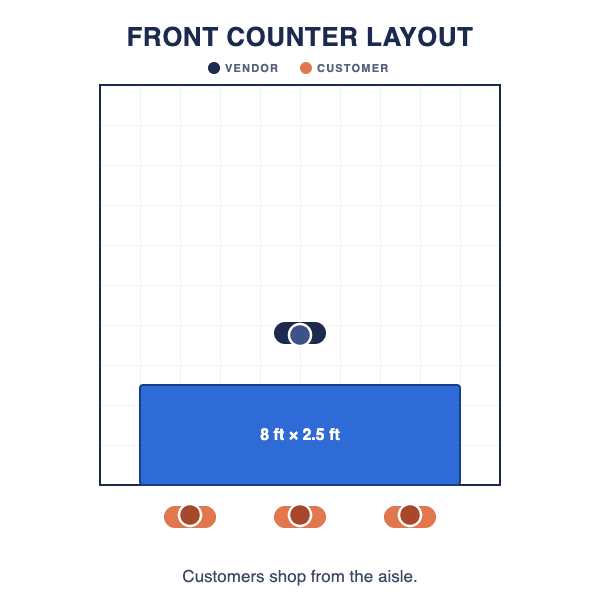
The front counter layout is one of the simplest options. A table sits across the front of your booth, customers shop from the aisle, and you stand behind it.
This puts your products close to people walking past. Someone can stop to look at a pair of earrings or pick out a greeting card without stepping into the tent. You also have room behind the table for packaging, extra inventory, and a chair. It is a useful starting point for vendors selling jewelry, soap, candles, stickers, cards, and other small items.
Most people start with this layout because it is very simple and effective. The tradeoff is that having just one table limits the amount of items you can showcase and also limits the amount of customers you can see at a time.
2. Back-Wall Vendor Booth Layout
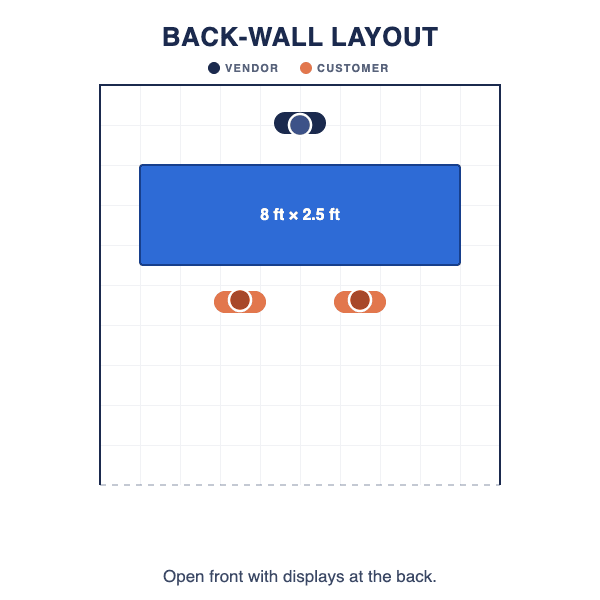
With this layout, the main table or display sits toward the back. Most of the floor stays open, and customers walk into the tent to browse. One benefit is having room for people to stop without standing in the event aisle. So if you’re at a very sunny craft fair or art show, people might step in to get a little bit of shade.
This can work for pottery, wooden bowls, cutting boards, and other pieces that benefit from a little space around them. Artists could use rear display panels for larger work, with a table or print bin nearby. Similarly to the front counter booth layout, one down side is that you are limited by table space since you’re only using one table.
3. Walk-Up L-Shaped Layout
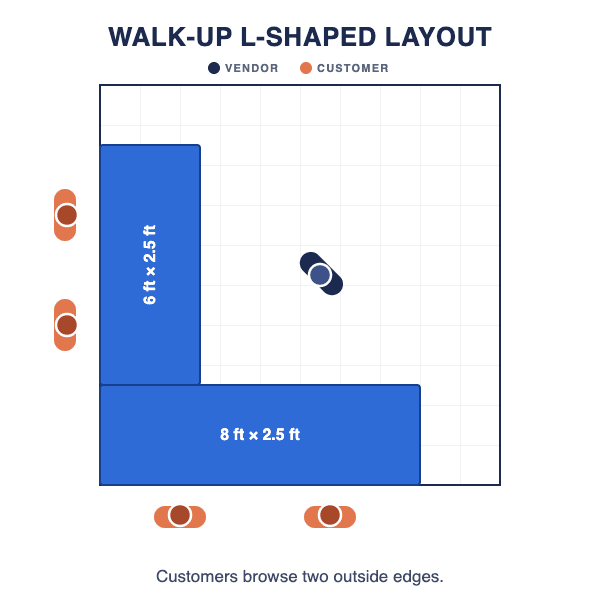
A walk-up L has tables along the front and one side. Customers browse around the outside while you work inside the L. It gives you more display space than a single front counter. You could put smaller gifts across the front and use the side table for a second collection.
This layout makes the most sense on a corner where both display edges face customer walkways. Before setting up, check which direction people are approaching from.
4. Walk-In L-Shaped Layout
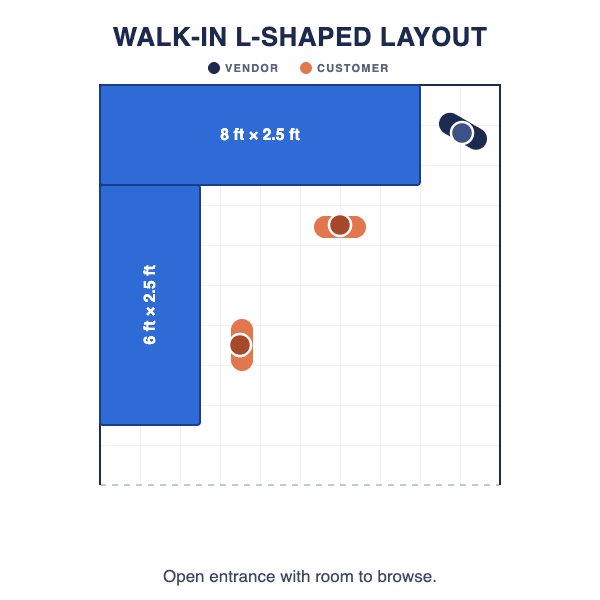
The walk-in L places displays along the back and one side. Customers enter through the front and browse inside. This gives you a useful balance of display space and open floor. There is room for a customer to step back from a shelf or hold up a bag without being surrounded by tables.
Similarly to the back-wall layout, this gives shoppers an opportunity to step in under your tent. However, you get about double the table space as with the back-wall layout. So if you sell products where you really need a lot of table space, you should consider the back L layout.
5. Walk-Up U-Shaped Layout for Craft Fairs
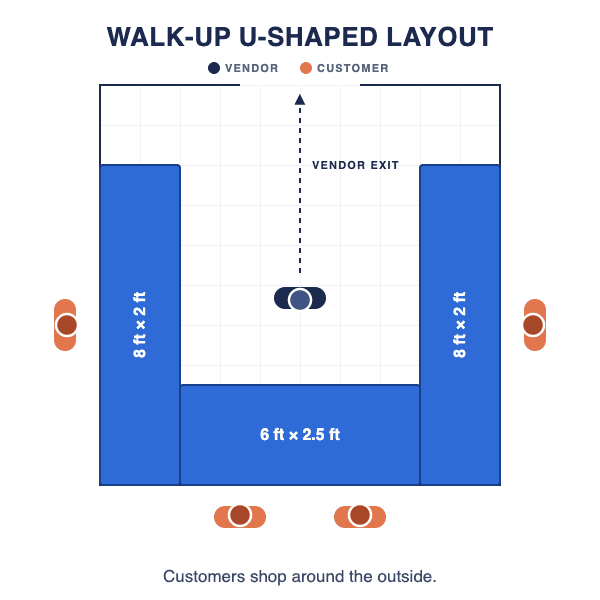
A walk-up U has tables across the front and along both sides. You work in the center while customers shop around the outside. The benefit is having several outward-facing display surfaces. You can separate products into sections while keeping a central space for restocking and taking payments.
However, this arrangement needs customer access along the front and both sides to use all three tables fully. If neighboring booths block both sides, much of your merchandise becomes difficult to reach. Check the event map before choosing this setup. You also need a practical way to enter and leave the central working area. Do not assume you can exit through the booth behind you.
6. Walk-In U-Shaped Layout
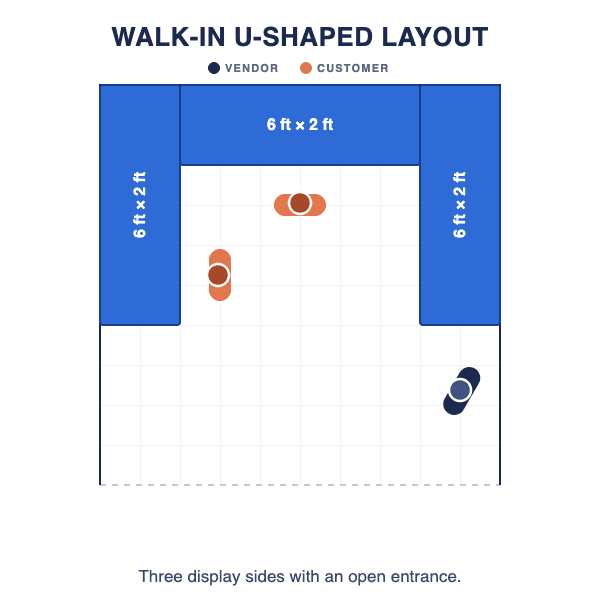
A walk-in U puts displays along the back and both sides, leaving the front open. Customers step into the middle and browse around them.
It gives you plenty of display space and lets you organize different collections. The main thing to watch is crowding. Deep tables, chairs, and floor displays can quickly fill the center. Narrow shelves or display panels may leave more room than standard folding tables.
7. Z-Shaped Layout
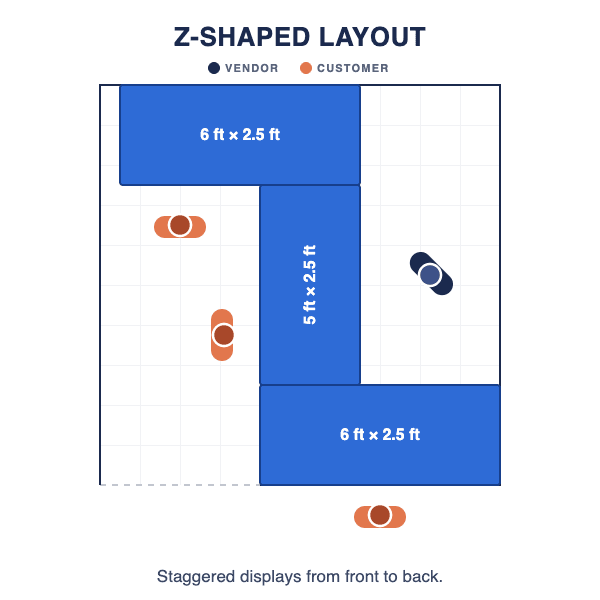
A Z-shaped layout uses three tables in a staggered zigzag. Part of the display sits near the front, while the other sections extend farther into the booth.
This gives people something to browse from the aisle without putting every product across the entrance. Someone might notice your small crochet animals at the front, then step inside to look at larger pieces. The different table sections give you places to separate products by type, theme, or price. If another vendor is beside you, make sure every shopping position stays within your own booth. Customers should not need to stand in your neighbor’s space to reach a display.
8. Parallel Vendor Booth Layout
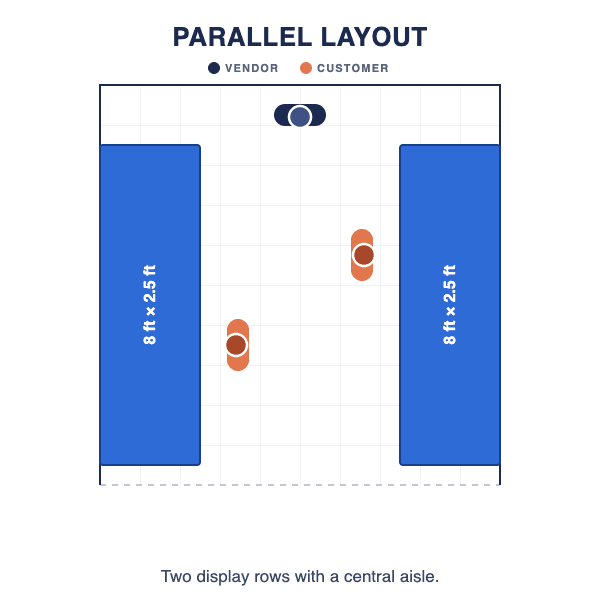
The parallel layout has displays along opposite sides, with a central aisle between them. It is a straightforward way to separate two product groups. A clothing vendor could put racks on one side and folded items on the other.
You can use tables, but shallow shelves or racks may give customers more room. Remember to measure the full fixture, including rack feet and merchandise hanging out from it. The main drawback is the central aisle becoming crowded. A customer browsing one side should leave enough room for someone else to pass.
9. Center Island Layout at Craft Fairs
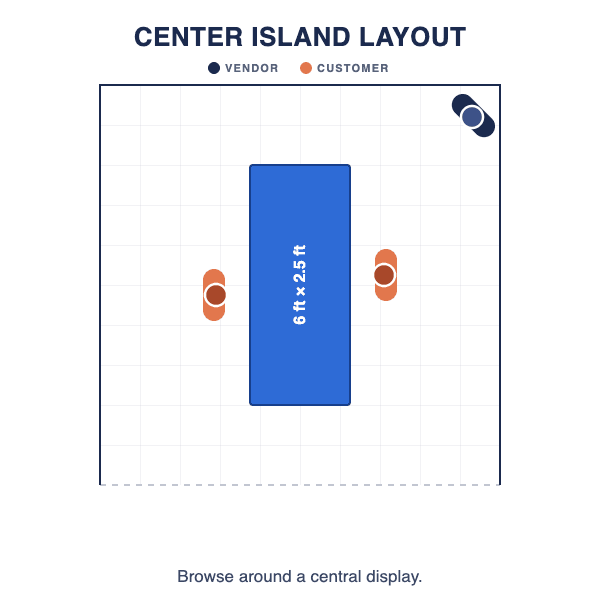
A center island places a freestanding display in the middle, with walking space around it. A long table running through the center is sometimes called an I-shaped layout.
Customers can look at products from different sides. It also gives you a place to demonstrate something. For example, shoppers could gather around a sample puzzle or watch how a handmade kitchen tool works. Storage and checkout take planning too. Adding another full-size table can use up the walking space that makes the island useful.
10. T-Shaped Layout
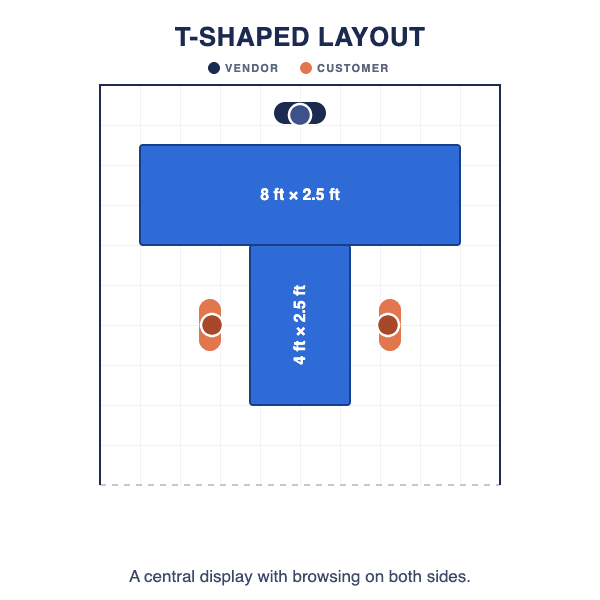
A T-shaped layout has a table across the back with another extending forward from its middle. Customers browse on either side of the projecting table. It is a less common vendor booth layout at craft fairs, but it could make sense for certain vendors.
The middle table divides the booth into two browsing areas. If customers cannot walk around its front end comfortably, they may have to step out and reenter to shop on the other side.
Try Your Booth Layouts at Home
Once you have a couple of layouts in mind, tape out a ten-foot square in your garage, driveway, or living room. Set up your actual tables and products, then add the things that are easy to forget: your chair, inventory bins, checkout supplies, and canopy weights.
Setting up at home will make setting up at the craft fair or art show a lot easier. You will develop a good process and develop muscle memory. You have limited time to set up, so every minute counts! It also gives you an opportunity to check for anything you hadn’t planned for, such as inventory storage or a sitting spot to rest.
Lastly, your best inspiration will come from checking out other booths at the craft fairs you attend. If you see something working really well, try it yourself!